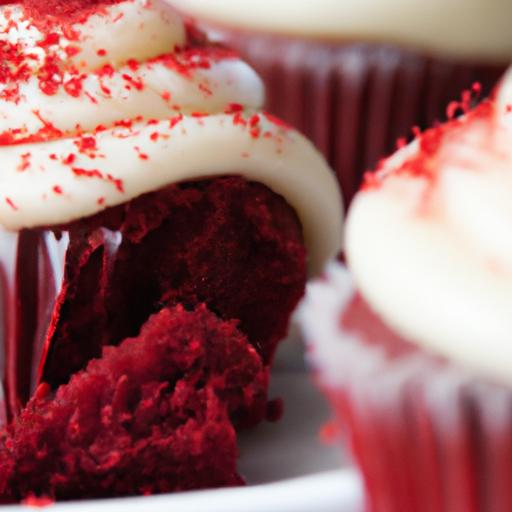
Beneath the velvety scarlet surface of a perfectly baked red velvet cupcake lies a secret that bakers have long sought to uncover. That tender, moist crumb-the hallmark of an unforgettable bite-isn’t just a happy accident but the result of carefully balanced ingredients and precise techniques. In this article, we peel back the layers of culinary mystery to reveal the subtle nuances and expert tips that transform ordinary red velvet cupcakes into irresistibly luscious treats. Whether you’re a novice baker or a seasoned pastry pro, prepare to elevate your baking game with the secret to perfectly moist red velvet cupcakes unveiled.
The Secret to Perfectly Moist Red Velvet Cupcakes Unveiled
The secret to perfectly moist red velvet cupcakes unveiled lies in understanding the delicate balance of ingredients and techniques that maximize moisture retention and flavor without compromising texture.Originating from the classic Southern dessert tradition, these cupcakes are renowned for their velvety crumb, subtle cocoa essence, and signature red hue. Over years of perfecting this recipe, I’ve unlocked how each element plays a crucial role in delivering that tender, melt-in-your-mouth experience cupcake lovers crave.
Prep and Cook Time
Preparation: 20 minutes
Baking: 18-22 minutes
Total Time: 40 minutes
Yield
12 perfectly moist red velvet cupcakes
Difficulty Level
Medium – Ideal for home bakers looking to elevate their cupcake game
Choosing the Ideal Ingredients for Ultimate Softness and Flavor
Moisture retention starts with selecting ingredients that work synergistically. Using buttermilk or sour cream provides acidity that tenderizes gluten progress and retains moisture by breaking down proteins. Incorporating oil in place of some butter keeps the crumb soft and resilient to drying out. The addition of vinegar heightens this effect by reacting with baking soda, creating carbon dioxide bubbles that aerate each bite, contributing to lightness while locking moisture inside. Lastly, the cocoa powder not only imparts subtle chocolate undertones but also enhances the red velvet’s characteristic softness. Choosing a natural cocoa powder with moderate fat content ensures richness without excess dryness.
Step by Step Techniques to Enhance Moisture in Every Bite
- start by sifting together all-purpose flour, cocoa powder, baking soda, and salt. This aerates dry ingredients, creating a finer crumb texture.
- Whisk the wet ingredients separately: Combine oil, sugar, eggs, buttermilk, red food coloring, vanilla extract, and vinegar. This ensures even distribution of moisture and color.
- Slowly fold the dry into the wet mixture.Overmixing develops gluten, creating toughness; handle the batter gently to keep it tender.
- Fill cupcake liners two-thirds full to allow space for expansion while retaining moistness.
- Bake at 350°F (175°C) until a toothpick inserted comes out with a few moist crumbs. overbaking dries cupcakes, so watch timing carefully.
- Immediately transfer cupcakes to a wire rack upon removal to stop heat penetration and prevent drying from residual heat.
expert Tips for Storage and Serving to Maintain Freshness
To preserve the luscious moisture of your cupcakes, store them in an airtight container at room temperature for up to 2 days. For longer storage, wrap them individually in plastic wrap and freeze for up to 2 months-allowing thawing at room temperature to keep the crumb soft and moist. When serving, pair with a cool cream cheese frosting that complements the cupcake’s texture without overpowering its delicate softness. garnish with a light dusting of cocoa powder or finely chopped pecans for an elegant finish.
Ingredients
- 1 1/4 cups all-purpose flour, sifted
- 2 tablespoons natural unsweetened cocoa powder, sifted
- 1/2 teaspoon baking soda
- 1/4 teaspoon salt
- 1/2 cup vegetable oil
- 1 cup granulated sugar
- 2 large eggs, room temperature
- 1/2 cup buttermilk, room temperature
- 1 tablespoon red food coloring
- 1 teaspoon pure vanilla extract
- 1 teaspoon distilled white vinegar
Instructions
- Preheat oven to 350°F (175°C). Line a 12-cup muffin tin with cupcake liners.
- Sift flour, cocoa powder, baking soda, and salt into a medium bowl.
- In a large bowl, whisk together oil and sugar until well blended, about 2 minutes.
- Add eggs one at a time, whisking thoroughly after each addition.
- Mix in buttermilk, red food coloring, vanilla extract, and vinegar until smooth and vibrant.
- Gradually fold dry ingredients into wet mix with a spatula, folding gently until just combined. Avoid overmixing to ensure softness.
- Divide batter evenly among cupcake liners, filling each about two-thirds full.
- Bake for 18-22 minutes or until a toothpick inserted in the center comes out with a few moist crumbs.
- Cool cupcakes in the pan for 5 minutes, than transfer to a wire rack to cool wholly before frosting.
Chef’s Notes
- For an ultra-moist crumb, substitute half the buttermilk with plain yogurt.
- If vegan adaptations are desired, use flax eggs (1 tbsp ground flaxseed + 3 tbsp water per egg) and a plant-based milk with vinegar.
- To avoid dryness, do not overbake; start checking 3 minutes before the minimum baking time.
- Classic cream cheese frosting pairs beautifully; refrigerate frosted cupcakes for optimal texture.
- Make batter ahead and refrigerate for up to 24 hours for convenient baking anytime.
Serving Suggestions
Present these cupcakes on a tiered dessert tray for a stunning occasion centerpiece.Garnish with a delicate chocolate curl or a sprinkle of edible glitter for celebratory flair. Serve with a side of freshly brewed coffee or a glass of cold milk to contrast and enhance the rich flavors. For a seasonal twist,add a hint of orange zest to the frosting or top with fresh raspberries for vibrant color and tangy balance.
| Nutritional Information (per cupcake) | Amount |
|---|---|
| Calories | 220 kcal |
| Protein | 3 g |
| Carbohydrates | 28 g |
| Fat | 11 g |

Explore more on cupcake perfection in our guide to fluffy cupcakes and deepen your baking expertise. For scientific insights on moisture retention in baked goods, visit the ScienceDaily article on baking chemistry.
Q&A
Q&A: The Secret to Perfectly Moist Red Velvet Cupcakes Unveiled
Q1: What makes red velvet cupcakes different from other cupcakes?
A1: Red velvet cupcakes stand out for their rich, velvety texture paired with a subtle cocoa flavor and a signature deep red hue.Unlike typical chocolate cupcakes, they strike a delicate balance between mild cocoa and tangy buttermilk, resulting in a unique, tender crumb that’s both visually stunning and delightfully moist.
Q2: Why is achieving moistness such a big deal with red velvet cupcakes?
A2: Moisture is the lifeblood of cupcakes-especially red velvet. The perfect moist crumb enhances both flavor and texture, preventing dryness that can overshadow the cupcake’s subtle nuances. Without proper moisture, red velvet cupcakes risk becoming crumbly or dense, losing that melt-in-your-mouth magic.
Q3: So,what’s the secret ingredient or technique that guarantees moist red velvet cupcakes?
A3: The secret lies in a trifecta: the right fat,the right acid,and the correct mixing method. Using oil instead of butter keeps the crumb tender and moist,while buttermilk adds acidity that tenderizes gluten and amplifies flavor. Additionally, incorporating vinegar reacts with baking soda to create lift and fluffiness. Gentle mixing ensures the batter stays light-overmixing can toughen the cupcakes.
Q4: can you break down the ideal recipe approach for moisture?
A4: Absolutely! Start with a blend of cake flour for softness, vegetable oil for moisture, and buttermilk for tang and tenderness. Add a touch of white vinegar and baking soda to boost rise and enhance crumb texture. Beat eggs and sugar until creamy but fold in dry ingredients with care-overmixing is the moisture thief! Lastly, a hint of vanilla and a pinch of salt round out the flavors beautifully.
Q5: Are ther baking tips to prevent dry red velvet cupcakes?
A5: Definitely. First, avoid overbaking-pull cupcakes out the moment a toothpick comes out with a few moist crumbs. Oven temperature matters too: too hot and the cupcakes dry out; too cool and they stay dense. Also, don’t skip the paper liners; they help lock in moisture. allow cupcakes to cool completely before frosting to prevent the icing from melting into a soggy mess.
Q6: How does frosting affect the overall moistness?
A6: Frosting doesn’t just add flavor-it’s a moisture partner. Classic cream cheese frosting creates a luscious contrast to the tender crumb, adding a creamy texture that complements and enhances the cupcake’s moistness. Plus, sealing cupcakes with frosting can help them stay fresh longer.
Q7: Can any substitutes be used to keep cupcakes moist without compromising the flavor?
A7: Yes! If buttermilk is unavailable, a mix of milk and lemon juice or vinegar can mimic its acidity and tenderness. Applesauce or Greek yogurt are also natural moisture boosters when swapped for oil or butter, though they may slightly alter texture or tang. The key is maintaining the acidic balance to preserve that signature red velvet bite.
Q8: What’s the best way to store red velvet cupcakes to keep them moist?
A8: Store cupcakes in an airtight container at room temperature for up to two days, or refrigerate for longer freshness. To prevent dryness, keep them away from direct air exposure and frost them only when fully cooled.When ready to serve, bring refrigerated cupcakes back to room temperature for the moistest experience.
With this secret trifecta of ingredients and techniques, your red velvet cupcakes will emerge irresistibly moist, tender, and bursting with flavor every time-a sensational treat worthy of any celebration!
In Conclusion
Now that the secret to perfectly moist red velvet cupcakes has been unveiled, your baking adventures are destined for sweet success. With these tips in hand, every bite will delight with tender crumb and rich flavor-a testament to the magic of technique and care. So, grab your mixing bowl, trust the process, and get ready to impress; your kitchen is about to become the home of irresistibly moist red velvet masterpieces. Happy baking!